Рассмотрим как при помощи Arduino считывать показания с цифрового датчика температуры DS18B20 или DS18S20. В настоящий момент м/с DS18B20 фирмы Dallas является наиболее распространенным и доступным цифровым датчиком температуры. Работает по протоколу 1-wire. Даташит датчика: DS18B20

Датчик может запитываться двумя способами — внешним питанием (3 провода) или паразитным (питание от шины, 2 провода). Расписывать эти режимы не буду, все есть в документации. Отмечу лишь то, что в данном проекте мы будем использовать нормальное (внешнее) питание датчика.
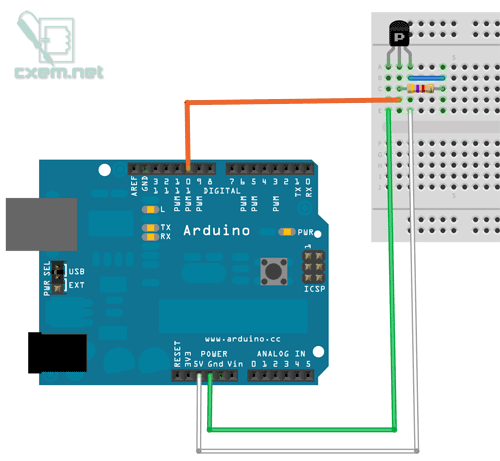
Схема подключения датчика DS18B20 к Arduino приведена ниже. Подтягивающий Pull-Up резистор номиналом 4.7 кОм (5 кОм) включается между выводом DQ (Data) и питанием датчика Vdd.

Рабочий скетч представлен ниже. Необходима библиотека OneWire, последнюю версию которой можно скачать здесь.
После установки библиотеки, в меню появиться рабочий пример, которым и можно воспользоваться.

#include «OneWire.h»
// OneWire DS18S20, DS18B20, DS1822 Temperature Example
//
// http://www.pjrc.com/teensy/td_libs_OneWire.html
//
// The DallasTemperature library can do all this work for you!
// http://milesburton.com/Dallas_Temperature_Control_Library
OneWire ds(10); // on pin 10 (a 4.7K resistor is necessary)
void setup(void) {
Serial.begin(9600);
}
void loop(void) {
byte i;
byte present = 0;
byte type_s;
byte data[12];
byte addr[8];
float celsius, fahrenheit;
if ( !ds.search(addr)) {
Serial.println(«No more addresses.»);
Serial.println();
ds.reset_search();
delay(250);
return;
}
Serial.print(«ROM =»);
for( i = 0; i < 8; i++) {
Serial.write(‘ ‘);
Serial.print(addr[i], HEX);
}
if (OneWire::crc8(addr, 7) != addr[7]) {
Serial.println(«CRC is not valid!»);
return;
}
Serial.println();
// the first ROM byte indicates which chip
switch (addr[0]) {
case 0x10:
Serial.println(» Chip = DS18S20″); // or old DS1820
type_s = 1;
break;
case 0x28:
Serial.println(» Chip = DS18B20″);
type_s = 0;
break;
case 0x22:
Serial.println(» Chip = DS1822″);
type_s = 0;
break;
default:
Serial.println(«Device is not a DS18x20 family device.»);
return;
}
ds.reset();
ds.select(addr);
ds.write(0x44, 1); // start conversion, with parasite power on at the end
delay(1000); // maybe 750ms is enough, maybe not
// we might do a ds.depower() here, but the reset will take care of it.
present = ds.reset();
ds.select(addr);
ds.write(0xBE); // Read Scratchpad
Serial.print(» Data = «);
Serial.print(present, HEX);
Serial.print(» «);
for ( i = 0; i < 9; i++) { // we need 9 bytes
data[i] = ds.read();
Serial.print(data[i], HEX);
Serial.print(» «);
}
Serial.print(» CRC=»);
Serial.print(OneWire::crc8(data, 8), HEX);
Serial.println();
// Convert the data to actual temperature
// because the result is a 16 bit signed integer, it should
// be stored to an «int16_t» type, which is always 16 bits
// even when compiled on a 32 bit processor.
int16_t raw = (data[1] << 8) | data[0];
if (type_s) {
raw = raw << 3; // 9 bit resolution default
if (data[7] == 0x10) {
// «count remain» gives full 12 bit resolution
raw = (raw & 0xFFF0) + 12 — data[6];
}
} else {
byte cfg = (data[4] & 0x60);
// at lower res, the low bits are undefined, so let’s zero them
if (cfg == 0x00) raw = raw & ~7; // 9 bit resolution, 93.75 ms
else if (cfg == 0x20) raw = raw & ~3; // 10 bit res, 187.5 ms
else if (cfg == 0x40) raw = raw & ~1; // 11 bit res, 375 ms
//// default is 12 bit resolution, 750 ms conversion time
}
celsius = (float)raw / 16.0;
fahrenheit = celsius * 1.8 + 32.0;
Serial.print(» Temperature = «);
Serial.print(celsius);
Serial.print(» Celsius, «);
Serial.print(fahrenheit);
Serial.println(» Fahrenheit»);
}