

Представлен проект измерителя емкости аккумуляторов, основанный на микроконтроллере, который может измерять практически все типы аккумуляторов. Измеритель может подключаться к компьютеру и давать полную информацию о аккумуляторе — график разряда и емкости.
Обратите внимание, что это мой первый серьёзный проект на Arduino.
Что должно получится в итоге
На этом графике произведены замеры аккумулятора с заявленной емкостью 2000 mAh. Реальная емкость оказалась 1580 mAh:

График измерений Li-Ion аккумулятора:
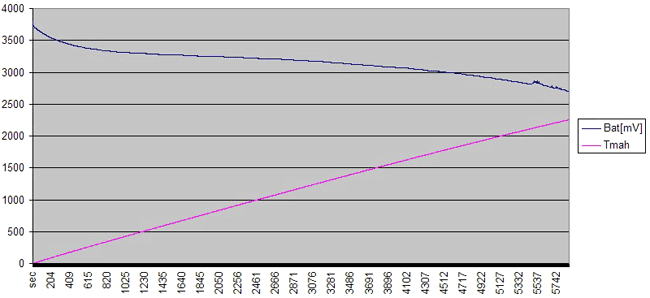
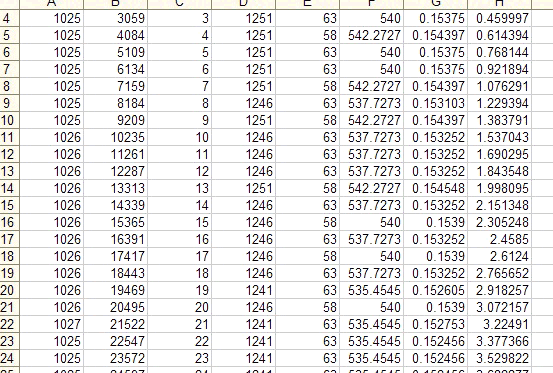
Все графики сформированны из текстового документа, с значениями измерений, на ПК.
Начало начал – Arduino
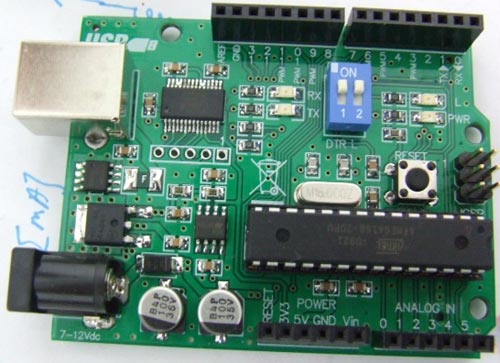
Эту копию Arduino Diecimila я ждал примерно 2 недели, поэтому я купил ATmega168 и подумал что смогу заставить её работать не хуже Arduino без нескольких компонентов (в частности без кварца). Но это не получилось и мне пришлось ждать 16МГц кварц и два конденсатора 22 пФ.
Конструкция измерителя
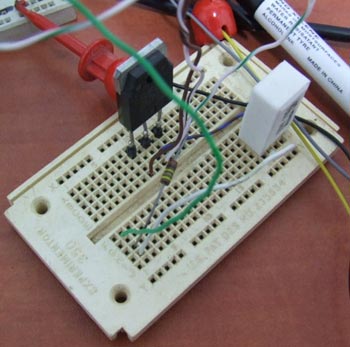
К транзистору подключен резистор 2.2Ом 10 Вт. К резистору я подключил два A/D контакта Arduino и измерял падение напряжения на нем, вычисляя из этого значения ток I = DeltaV/R.
Я также добавил зуммер для оповещения окончания заряда и необходимости отключения аккумулятора.
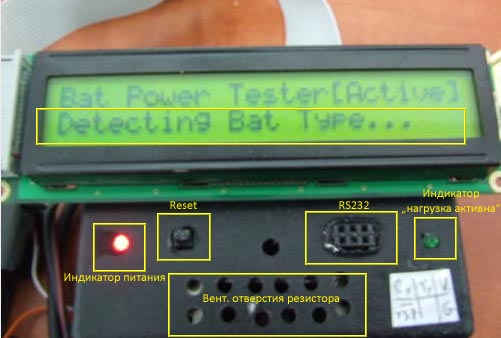
Для индикации я использовал ЖК-дисплей 2*16. Я нашел документацию и пример работы с ним на сайте Arduino и начала разрабатывать программу.
Тип используемого аккумулятора (NiMH/NiCD или Li-ION) определяется по диапазону напряжения. После определения типа аккумулятора, начнется его разрядка для определения параметров.
Цикл разряда аккумулятора длится 30-120 минут. Длительность цикла зависит от емкости аккумулятора.
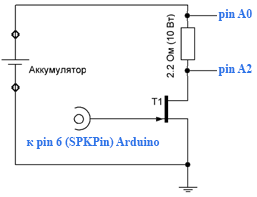
Параллельно резистору подключаются 2 A/D контакта.
Vr = Vbat-Vfet.
Программа
#include LiquidCrystal.h
int sensorPin = 0; // к пину Analog IN 0
int sensor2Pin = 2; // к пину Analog IN 2
int SPKPin = 6; // пин к затвору транзистора
int ledPin = 13; // пин LED
LiquidCrystal lcd(12, 11, 5, 4, 3, 2); // initialize the library with the numbers of the interface pins
int sensorValue = 0; // variable to store the value coming from the sensor
int sensor2Value = 0; // variable to store the value coming from the sensor
float LiMinThreshold = 2700; // Lithium Minimal Voltage for load removal
float LiMaxThreshold = 4200; // Lithium Max Voltage for load removal
float NmhMinThreshold = 950; // NMH Minimal Voltage for load removal
float NmhMaxThreshold = 1600; // NMH Max Voltage for load removal
float SelectedMinThreshold = 5000;
int i;
int BatVoltage = 5000;
int FetVoltage = 5000;
long TotalCurrent = 0;
boolean done = false;
unsigned long PrevMillis ;
unsigned long MillisPassed ;
void CL2(){
lcd.setCursor(0, 1);// Second line first char
lcd.print(» «);
lcd.setCursor(0, 1);// Second line first char
}
void setup() {
Serial.begin(9600);// start serial port to send data during run to the PC
pinMode(ledPin, OUTPUT);//activation led and enable for FET
pinMode(SPKPin, OUTPUT);//activation led and enable for FET
lcd.begin(24, 2);// set up the LCD’s number of rows and columns:
lcd.print(«Bat PWR Tester[Active]»); // Print a message to the LCD.
lcd.setCursor(0, 1);// Second line first char
lcd.print(«Detecting Bat Type…»); // print voltage value
delay(2000);
lcd.setCursor(0, 1);// Second line first char
lcd.print(» «);
lcd.setCursor(0, 1);// Second line first char
digitalWrite(ledPin, HIGH); // set the LED on
sensorValue = analogRead(sensorPin); // read the value from the sensor:
digitalWrite(ledPin, LOW); // set the LED off
// Detecting battery type
BatVoltage = sensorValue*4.887;
if (BatVoltage > 4500){
lcd.print(«Warning high-V! «);
done = true;}
else if (BatVoltage > LiMinThreshold){
lcd.print(«Type:Li-Ion Bat «);
SelectedMinThreshold = LiMinThreshold;}
else if (BatVoltage > NmhMinThreshold){
lcd.print(«Type:NiMH/Cd Bat «);
SelectedMinThreshold = NmhMinThreshold;}
else{
lcd.print(«Unknown Bat V < 1»);
done = true;}
lcd.print(«V=»);
lcd.print(sensorValue*4.887); // print voltage value
Serial.print(«DT[ms]»);
Serial.print(«t»);
Serial.print(«Bat[mV]»);
Serial.print(«t»);
Serial.print(«Fet[mV]»);
Serial.println(«»);
delay(3000);
CL2();
PrevMillis = millis();
}
void loop() {
if (BatVoltage > SelectedMinThreshold && !done) {
digitalWrite(ledPin, HIGH); // set the LED on
sensorValue = analogRead(sensorPin); // read the value from the sensor:
sensor2Value = analogRead(sensor2Pin); // read the value from the FET:
FetVoltage = (sensor2Value*4.887);
BatVoltage = (sensorValue*4.887);
CL2();
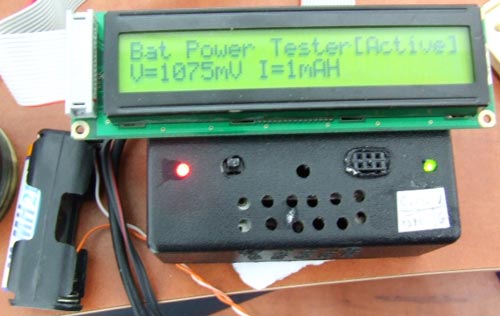
lcd.print(«V=»);
lcd.print(BatVoltage); // print voltage value
lcd.print(«mV»);
//lcd.print(FetVoltage); // print voltage value
TotalCurrent=TotalCurrent+MillisPassed/1000*(BatVoltage-FetVoltage)/2.2/3.6;
lcd.print(» I=»);
lcd.print(TotalCurrent/1000);
lcd.print(«mAH «);
delay(1000);
MillisPassed = millis()- PrevMillis;
PrevMillis = millis();
Serial.print(int(MillisPassed));
Serial.print(«t»); // prints a tab
Serial.print(BatVoltage);
Serial.print(«t»); // prints a tab
Serial.print(FetVoltage);
Serial.println(«»); // prints a tab
CL2();
}
else
{
done=true;
digitalWrite(ledPin, LOW); // set the LED off — stop loading
lcd.setCursor(0, 0);// First line first char
lcd.print(«Bat Power Tester [DONE] «); // Print a message to the LCD.
CL2();//clear line 2
sensorValue = analogRead(sensorPin); // read the value from the sensor:
BatVoltage = (sensorValue*4.887);
lcd.setCursor(0, 1);// Second line first char
lcd.print(«V=»);
lcd.print(BatVoltage); // print voltage value
lcd.print(«mV I=»);
lcd.print(TotalCurrent/1000);
lcd.print(«mAH «);
for (int i=0; i<100 ; i++){
digitalWrite(SPKPin, HIGH);
delay(1);
digitalWrite(SPKPin, LOW);
delay(1);
}
delay(1000);
}
}
Схема подключения LCD к Arduino — стандартная. Посмотреть можно на официальном сайте по Arduino.